From Real Exams Quiz
Secondary 1 Science Scientific Inquiry Quiz
Free Sec 1 Science Scientific Inquiry quiz, Kimi2.6 Exam version, with questions, answers, and syllabus-aligned practice for Singapore students.
These static practice materials are generated from the site's syllabus and paper-generation workflow, with source and model context shown so students and parents can evaluate the material before use.
Questions
Free quiz and exam paper access
Enter your details to view this paper
Your access is remembered on this device.
Answers
Secondary 1 Science Quiz - Scientific Inquiry: Answer Key
Total marks: 40
Section A: Multiple Choice
1. B (2 marks)
Explanation: A fair test requires changing only the independent variable while keeping all other variables constant. This isolates the effect of the variable being tested. Option A is incorrect because expected results can be biased. Option C describes reliability, not fairness. Option D describes equipment choice, not experimental design.
2. C (2 marks) — Assuming the true value is approximately 15.2–15.3 cm
Explanation: Precision refers to how close repeated measurements are to each other (these readings are close: range is only 0.2 cm). Accuracy refers to how close measurements are to the true value. Without knowing the true value precisely, the clustering suggests precision; the consistency around 15.2–15.3 cm suggests reasonable accuracy if the rod is about 15.2–15.3 cm long. Common trap: If the true value were very different (e.g., 20.0 cm), these would be precise but not accurate. The question implies the readings are reasonable.
3. B (2 marks)
Explanation: To test how mass affects period, the string length, amplitude of swing, and material of the bob must all be controlled as they could also affect the period. The mass of the bob is the independent variable being changed, not controlled. Temperature could also be controlled but is less critical.
4. B (2 marks)
Explanation: A zero error of +0.5°C means the thermometer reads 0.5°C high even when it should read 0°C. This is a systematic error because it affects all readings in the same direction by the same amount. It is not random because it doesn't vary unpredictably between measurements. The boiling water reading will therefore be 0.5°C too high.
5. D (2 marks)
Explanation: Conversion path: mg → g → kg
- 2500 mg = 2500 ÷ 1000 = 2.5 g
- 2.5 g = 2.5 ÷ 1000 = 0.0025 kg
Or directly: 2500 ÷ 1 000 000 = 0.0025 kg
6. D (2 marks)
Explanation: In an experiment, the independent variable (what you deliberately change) goes on the x-axis, and the dependent variable (what you measure/observe) goes on the y-axis. The student is changing time (heating duration) and measuring temperature, so temperature is the dependent variable on the y-axis.
7. B (2 marks)
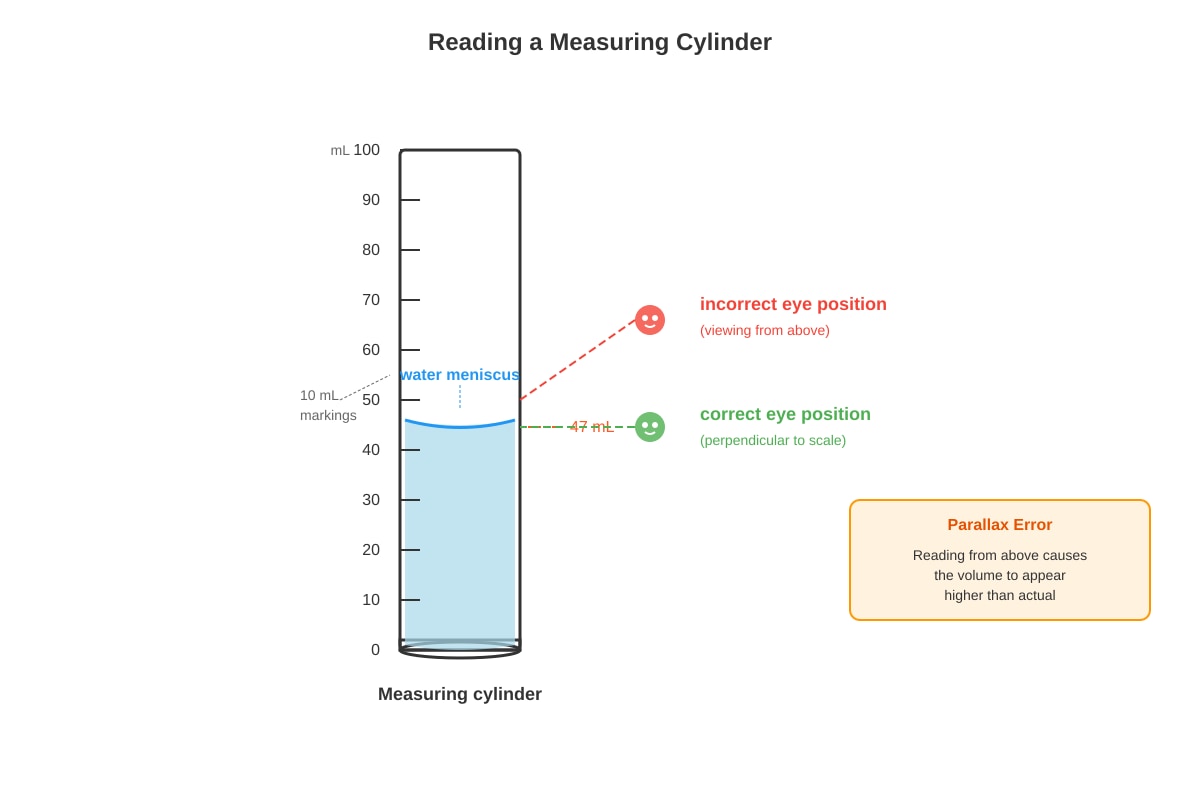
Explanation: Parallax error occurs when the observer's eye is not at right angles (perpendicular) to the scale. This causes an apparent shift in the position of the pointer or meniscus, leading to incorrect readings. It is a reading error, not a calibration error (A), thermal expansion (C), or motion error (D).
8. C (2 marks)
Explanation: The independent variable is what the experimenter deliberately changes: the concentration of fertilizer. The final height (A) is the dependent variable. The type of plant (B) and amount of water (D) should be controlled variables.
Section B: Structured Response
9. A hypothesis is a testable statement that predicts the relationship between the independent variable and the dependent variable, based on prior knowledge or observation. (2 marks)
Marking point: Must include "testable/predictable/falsifiable statement" (1 mark) and mention relationship between variables or prediction of outcome (1 mark).
10. Investigation: How surface area affects rate of cooling.
(a) Independent variable: The surface area of the beaker (or "size of beaker") (1 mark)
(b) Dependent variable: The temperature of the water after a fixed time OR The time taken to cool by a certain temperature OR The rate of temperature decrease (1 mark)
(c) Any two from:
- Initial temperature of the water
- Volume/mass of water used
- Material of the beaker
- Room temperature/surrounding temperature
- Position of thermometer/stirring method (2 marks)
11. Measuring cylinder with water:
(a) 47 mL (or 47.0 mL) (1 mark)
Teaching note: Read the bottom of the meniscus at eye level. The diagram shows the water level with the meniscus curve sitting at the 47 mL mark.
(b) Reading from above causes parallax error (1 mark). The meniscus appears higher than it actually is, so the reading would be greater than the true volume (1 mark). This is because light from the scale appears to come from a different direction when the eye is not perpendicular to the liquid surface.
12. Mass and density calculation:
(a) 4 significant figures (1 mark)
Counting: 4-5-2-3: all non-zero digits are significant, and the zero between non-zero digits is also significant.
(b) Density calculation:
(2 marks working)
To appropriate significant figures: The mass has 4 sig figs, the volume has 3 sig figs, so the answer should have 3 significant figures: 2.45 g/cm³ or 2.44 g/cm³ depending on rounding (1 mark for correct rounding)
Note: 45.23 ÷ 18.5 = 2.445405... → rounds to 2.45 g/cm³.
13. Rebound height and temperature:
(a) Experimental design (4 marks):
Method: Heat balls to different temperatures (e.g., using water baths at 20°C, 40°C, 60°C, 80°C) (1 mark). Drop the ball from a fixed height onto a hard surface (1 mark). Measure the rebound height using a metre rule or video analysis (1 mark).
Controlled variables: Mass of the ball, material of the ball, drop height, surface material, method of dropping (1 mark for any two controlled variables with values).
(b) Reliability improvement (2 marks): Repeat the experiment multiple times at each temperature and calculate a mean/average (1 mark). This reduces the effect of random errors and anomalous results (1 mark). Alternatively: use a video camera to measure rebound height more precisely.
14. Pendulum data analysis:
(a) Period = Time for 20 oscillations ÷ 20
For 60.0 cm: Period = 31.0 ÷ 20 = 1.55 s (2 marks)
Working: 31.0 ÷ 20 = 1.55 shown (1 mark), correct answer with unit (1 mark)
(b) Measuring 20 oscillations is better because (2 marks):
- The reaction time error at the start and stop is spread over 20 oscillations, making the error per oscillation smaller (1 mark)
- The period is very short (~1.5 s), so human reaction time (~0.2 s) would cause a large percentage error for just one oscillation (1 mark)
- OR: It allows identification of anomalous results
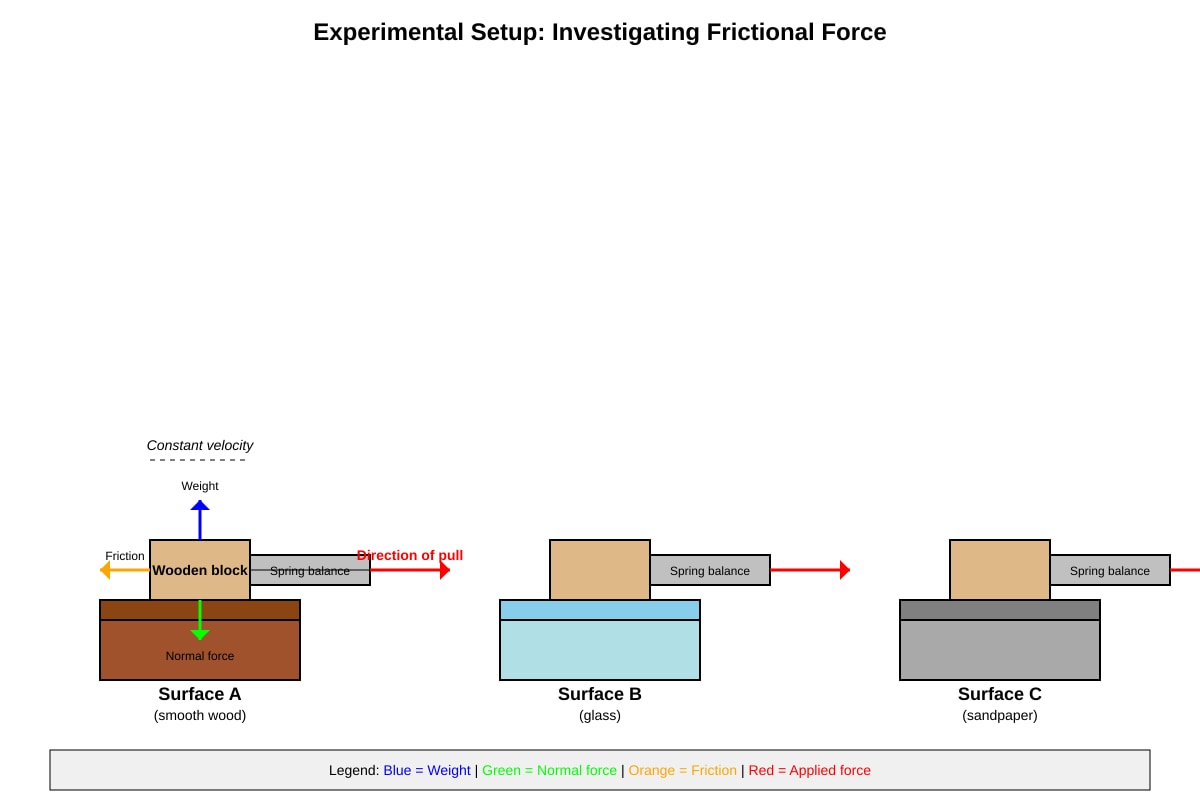
15. Friction experiment:
(a) The initial higher reading is due to static friction (1 mark). Static friction is greater than kinetic/dynamic friction because more force is needed to start the object moving than to keep it moving (1 mark). Once moving, the block only needs to overcome kinetic friction, which is lower.
(b) Constant velocity is shown when the spring balance reading is constant/steady (1 mark) or when the block covers equal distances in equal time intervals (1 mark). This is important because at constant velocity, the forward pull force equals the frictional force (Newton's first law/balanced forces) (1 mark). If accelerating, the spring balance would show a net force greater than friction.
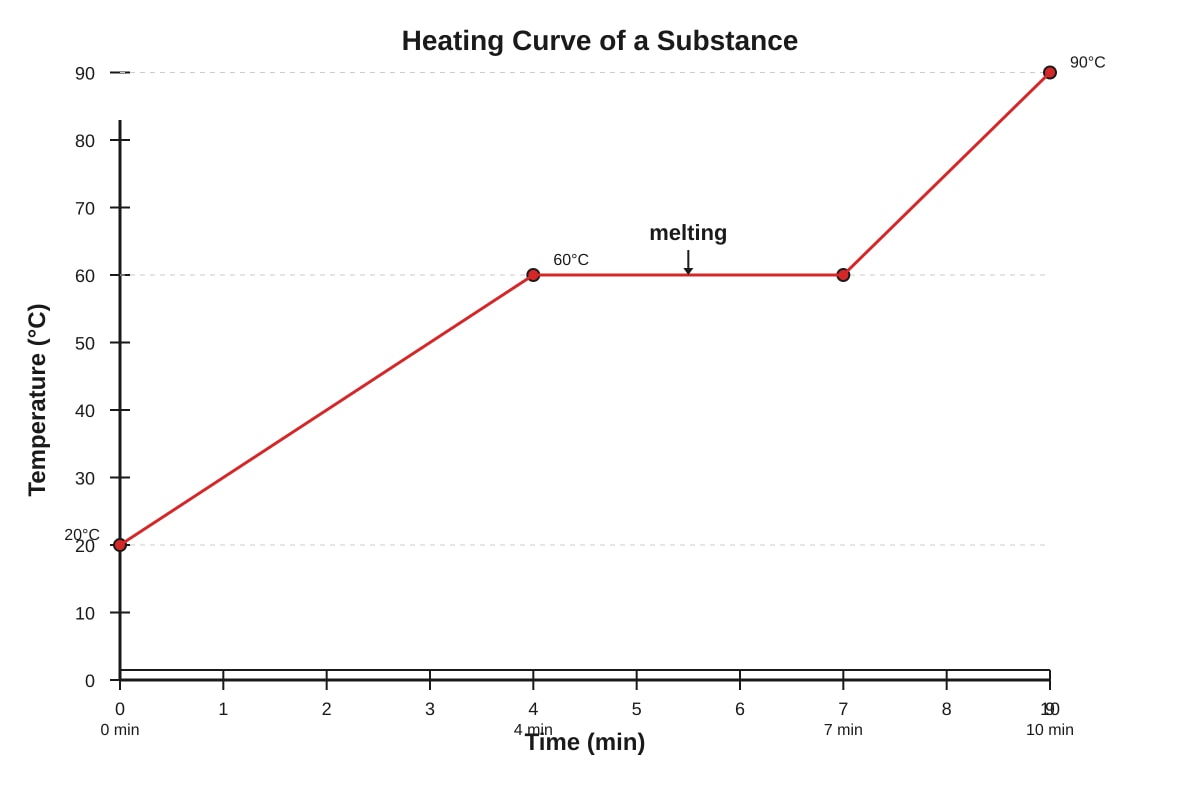
16. Heating curve:
(a) 60 °C (1 mark)
Reading from graph: The flat plateau occurs at 60°C.
(b) Between 4 and 7 minutes, the substance is melting/changing from solid to liquid (1 mark). The temperature stays constant because energy is being used to overcome the forces between particles/break bonds rather than increase kinetic energy (1 mark). In the particle model: in the solid, particles vibrate in fixed positions; as heat is added, particles gain enough energy to break free from their positions and move past each other as a liquid (1 mark).
(c) Temperature doesn't rise because the latent heat of fusion is being absorbed (1 mark). This energy breaks intermolecular bonds and increases the potential energy of the particles, not their kinetic energy. Since temperature is a measure of average kinetic energy, it remains constant during the phase change (1 mark).
Section C: Data Analysis and Evaluation
17. Measuring paper thickness:
(a) Advantage of Ahmad's method: The total thickness is much larger and easier to measure accurately with a mm ruler (1 mark). Measuring one sheet directly is difficult because the thickness is less than the ruler's smallest division (1 mm), leading to large percentage error. The cumulative method reduces percentage error significantly.
(b) Thickness = Total thickness ÷ Number of sheets
(2 marks)
Working shown (1 mark), correct answer with unit (1 mark). Could also be expressed as 9.6 × 10⁻² mm.
(c) Error source: The book cover thickness is included in the 48 mm (1 mark). This makes the calculated sheet thickness greater than the true value because the cover is thicker than paper. OR: Compression of sheets makes the total thickness less, leading to underestimate. OR: Pages are double-sided (each sheet = 2 pages), so dividing by 500 might be wrong if the book has 500 pages = 250 sheets (1 mark explanation).
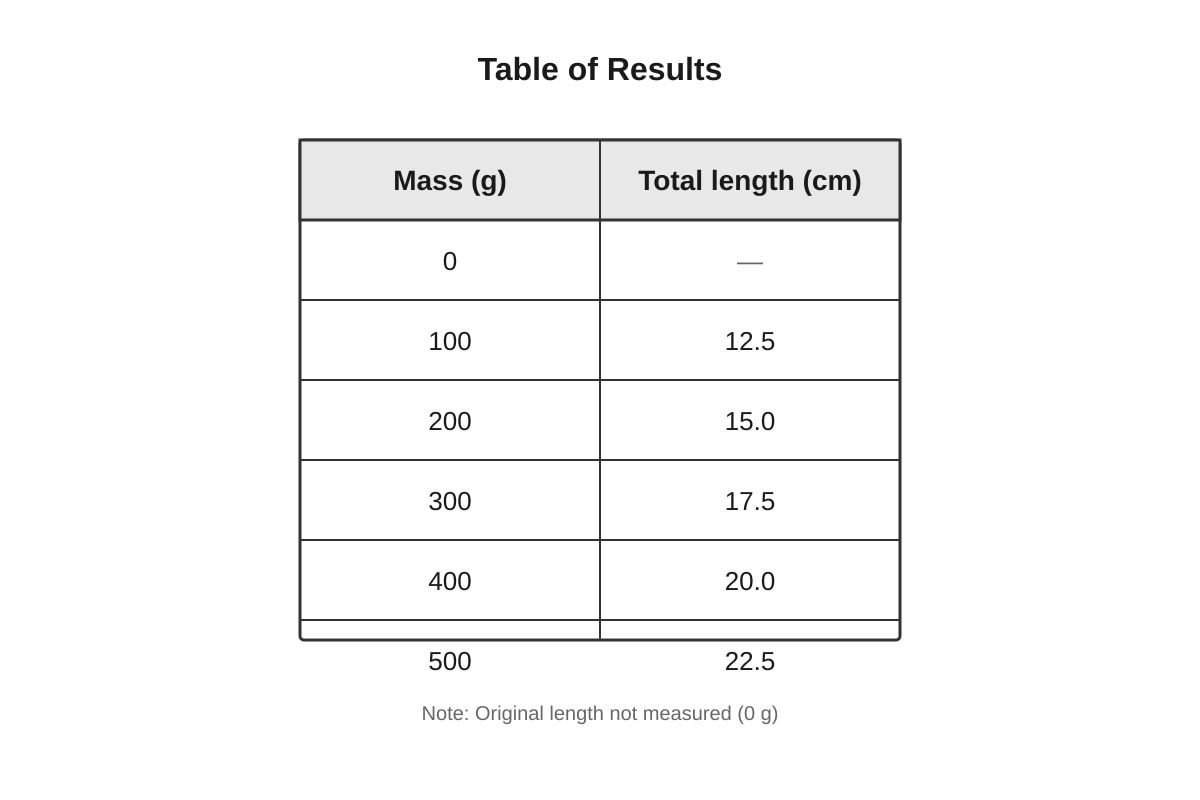
18. Spring extension:
(a) Original length = 10.0 cm (1 mark)
Reasoning: The data shows a linear pattern. Extension per 100 g = 2.5 cm (12.5 − 10.0, or 15.0 − 12.5, etc.). Working backwards from 100 g (12.5 cm total), the original length is 12.5 − 2.5 = 10.0 cm (2 marks for clear reasoning showing the constant extension per 100 g load). Alternatively: plot graph and extrapolate to zero load.
(b) Extension = Total length − Original length
For 300 g: Total length = 17.5 cm
(2 marks)
Working (1 mark), correct answer with unit (1 mark).
(c) Direct proportionality test (3 marks):
Calculate ratio of extension to load/mass:
- 100 g: 2.5 cm → 0.025 cm/g
- 200 g: 5.0 cm → 0.025 cm/g
- 300 g: 7.5 cm → 0.025 cm/g
- 400 g: 10.0 cm → 0.025 cm/g
- 500 g: 12.5 cm → 0.025 cm/g
The ratio is constant (1 mark), the graph of extension against load would be a straight line through the origin (1 mark — "through origin" is crucial for direct proportionality), therefore the conclusion is supported (1 mark).
Note: The data shows direct proportionality because extension/load is constant and the line would pass through (0,0): zero load means zero extension.
19. Scientific report structure:
(a) Correct order: D → B → C → A → E (2 marks)
Full marks: D B C A E in exact order (2 marks). If order is wrong but shows some understanding, 1 mark.
Reasoning: Hypothesis → Method → Results → Conclusion → Evaluation is the standard scientific report structure.
(b) Digital thermometer improvement (3 marks):
A digital thermometer improves both accuracy and precision (1 mark). It is more accurate if it has been calibrated to closer agreement with the true value, or if it has a smaller systematic error (1 mark). It is more precise because it typically gives readings to more decimal places (e.g., 25.3°C vs "between 25 and 26" on a liquid thermometer), reducing reading uncertainty (1 mark).
Note: If student argues only one aspect, award marks for correct reasoning. Higher resolution mainly improves precision; better calibration mainly improves accuracy. Many digital thermometers offer both advantages.
(c) Method improvement (3 marks):
Any valid suggestion with explanation, e.g.:
- Use a lid on containers to prevent evaporation and convection currents (1 mark). This ensures heat loss is mainly through the insulation, not other routes, making the comparison fairer (2 marks).
- Use the same starting temperature measured precisely and wait for stable conditions (1 mark). This ensures the temperature difference driving heat loss is the same at the start for all trials (2 marks).
- Repeat the experiment with identical setups (1 mark). Identify and exclude anomalous results, calculate a mean, making the conclusion more reliable (2 marks).
20. Bacteria and cleaning product:
(a) Hypothesis: The cleaning product reduces/kills the number of bacteria on a surface compared to using water alone (1 mark)
Or: The more concentrated the cleaning product, the fewer bacteria survive. Must be testable and mention the expected relationship.
(b) Control setup (3 marks):
The control should be a petri dish with nutrient agar swabbed with water (or no cleaning product) instead of the cleaning product (1 mark), with all other conditions identical: same surface type, same swabbing method, same incubation time and temperature (1 mark). The purpose is to provide a baseline for comparison (1 mark), showing whether any reduction in bacteria is due to the cleaning product or other factors.
(c) Five replicates (3 marks):
Using five replicates allows calculation of a mean/average (1 mark), which reduces the effect of random variation/anomalous results (1 mark). One dish might give an unusual result due to contamination or uneven swabbing; multiple dishes show whether a pattern is consistent and allows statistical comparison (1 mark).
(d) Safety precaution (2 marks):
Wear gloves and a mask OR work near a Bunsen burner flame (aseptic technique) OR disinfect surfaces after OR do not open petri dishes fully/tape them shut (1 mark). This is necessary because bacteria may be pathogenic/harmful or spores could be inhaled (1 mark). Opening fully risks releasing bacterial spores into the air.
END OF ANSWER KEY