From Real Exams Exam Paper
Secondary 1 Geography Semestral Assessment 2 (End of Year) Paper 5
Free Sec 1 Geography SA2 Paper 5, Kimi2.6 Exam version, with questions, answers, and syllabus-aligned practice for Singapore students.
These static practice materials are generated from the site's syllabus and paper-generation workflow, with source and model context shown so students and parents can evaluate the material before use.
Questions
Free quiz and exam paper access
Enter your details to view this paper
Your access is remembered on this device.
Answers
TuitionGoWhere Practice Paper - Geography Secondary 1
Answer Key: SA2 Practice Paper - Map Graph Data Skills
Version 5 of 5
SECTION A: Map Skills (20 marks)
Question 1 (2 marks)
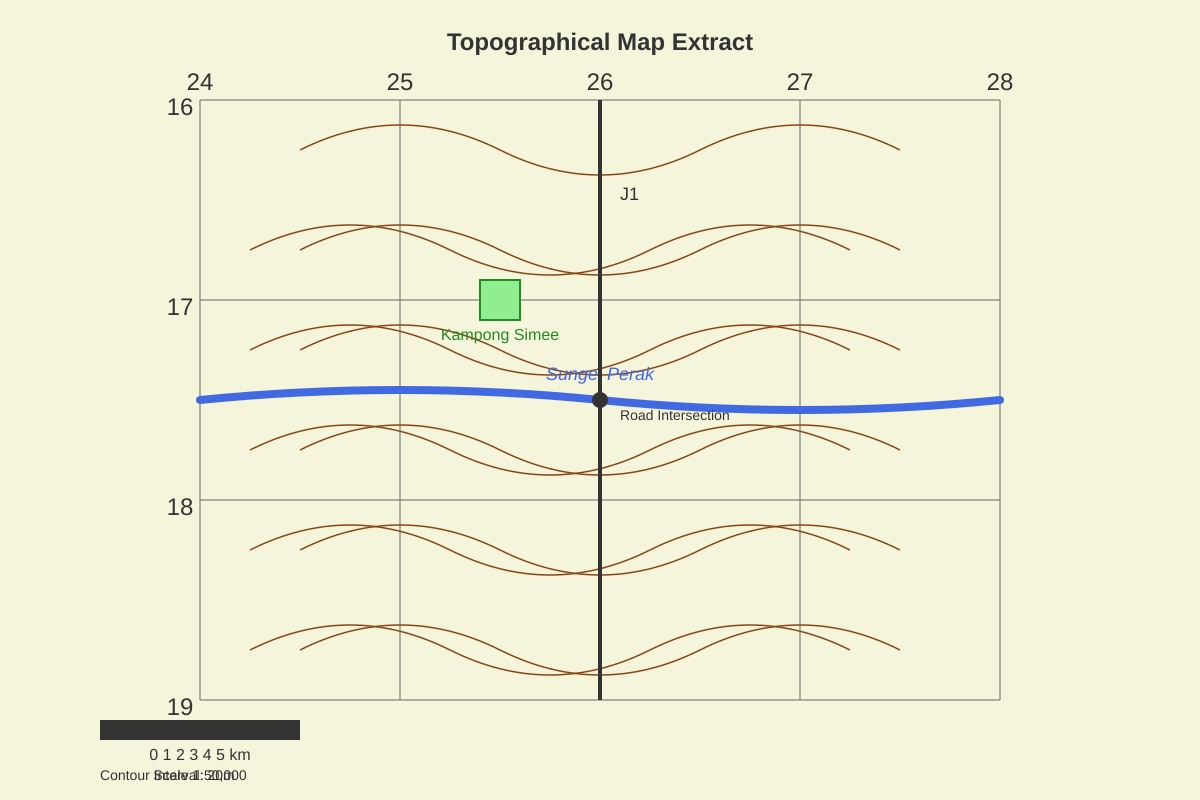
(a) Answer: 2517 (or equivalent: 2517 grid square)
Teaching notes: A 4-figure grid reference identifies a square on the map. Always read eastings first (horizontal, left to right), then northings (vertical, bottom to top). Find the bottom-left corner of the square containing Kampong Simee. The easting is 25, the northing is 17, giving 2517.
Common error: Writing 1725 (reversed order) — this scores 0 marks.
(1 mark)
(b) Answer: 261180 (or acceptable range: 261178 to 261182)
Teaching notes: A 6-figure grid reference pinpoints a location within the square. For the road intersection at 2618, estimate tenths within the square. If the intersection is at the bottom-left corner of square 2618, it would be 261180 (26 easting, 18 northing, with 0 tenths in both directions — at the exact corner). Accept reasonable estimates: the bridge center might be estimated at roughly 261180.
Method:
- Easting 26, estimate 1 tenth east = 261
- Northing 18, estimate 0 tenths north = 180
- Combine: 261180
Common error: Reversing eastings/northings or omitting a digit.
(1 mark)
Question 2 (3 marks)
(a) Answer: South-west / SW / approximately 225°
Teaching notes: To find direction from A to B, place your compass point at the starting location (road intersection at 2618) and read the direction toward the destination (Kampong Simee at 2517). Kampong Simee is to the south (lower northing: 17 vs 18) and west (lower easting: 25 vs 26), so the direction is south-west.
(1 mark)
(b) Answer: Approximately 1.5 km (accept range 1.4–1.6 km depending on measurement)
Working:
- Map measurement: approximately 3 cm (using ruler on map at 1:50,000 scale)
- Real distance = map distance × scale denominator
- Real distance = 3 cm × 50,000 = 150,000 cm
- Convert to km: 150,000 ÷ 100,000 = 1.5 km
Or using scale bar: if measured as approximately 3 segments of 0.5 km each = 1.5 km.
Teaching notes: At 1:50,000, 1 cm on the map = 0.5 km on the ground (since 50,000 cm = 0.5 km). Measure carefully with a ruler; do not guess. Always show your measurement and calculation — marks are for method, not just correct answer.
(2 marks: 1 mark for measurement, 1 mark for correct conversion and answer with unit)
Question 3 (2 marks)
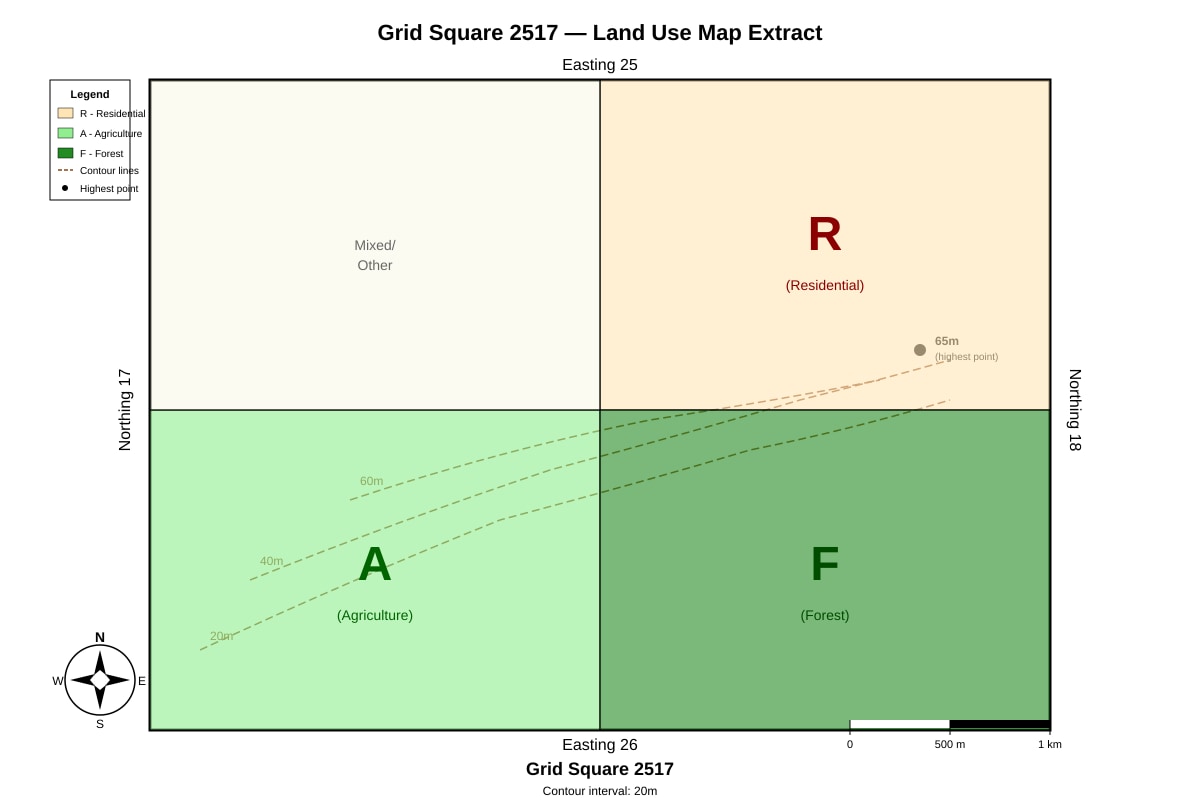
Answer: Residential land use (R) is in the northeast; agriculture (A) is in the southwest; forest (F) is in the southeast. The northwest appears mixed/unclassified. OR: The land uses are segregated/zoned with no mixing; each quadrant has a dominant use.
Marking descriptors:
- 2 marks: Clear description of spatial pattern (identified by direction/quadrant) with at least three land uses correctly located
- 1 mark: Partial description with one or two land uses identified or vague directional language
Teaching notes: "Distribution" questions require you to describe where things are located. Use compass directions or quadrant descriptions. Note patterns like clustering, zonation, or fragmentation.
(2 marks)
Question 4 (3 marks)
(a) Answer: 20 metres / 20 m
Teaching notes: The contour interval is the vertical distance between adjacent contour lines. It is constant across the map. Check any two labeled contours: e.g., 20m and 40m differ by 20m; 40m and 60m differ by 20m. Therefore interval = 20m.
(1 mark)
(b) Answer: The contour lines are closely spaced in grid square 2616; closely spaced contours indicate steep slopes because the land rises (or falls) 20 metres over a short horizontal distance.
Teaching notes: Steepness is shown by contour spacing, not just contour values.
- Closely spaced contours = steep slope (rapid change in elevation over short distance)
- Widely spaced contours = gentle slope (gradual change)
Look at the horizontal distance between 20m, 40m, 60m contours in 2616 compared to other squares. In 2616, they are bunched together.
Marking descriptors:
- 2 marks: Correctly identifies close spacing AND explains the relationship to steepness
- 1 mark: Identifies close spacing only, OR vague explanation
(2 marks)
Question 5 (2 marks)
(a) Answer: Blue sinuous/wavy line (or: double blue lines with blue fill; or: river symbol shown as two parallel wavy lines)
Teaching notes: On topographical maps, rivers are typically shown in blue. The specific symbol depends on river width — major rivers often have double lines with blue shading between them, while minor streams have single blue lines.
(1 mark)
(b) Answer: The double-line symbol indicates it is a perennial/wide river (not a seasonal stream); the wavy pattern shows the meandering nature of the river channel; the filled blue area shows water is present year-round.
Accept: "To distinguish it from a minor stream/drain" or "To show it is navigable/wide enough to be significant on a 1:50,000 map."
Teaching notes: Map symbols convey information about feature type and importance. A single blue line might represent a narrow stream or seasonal watercourse; the broader symbol indicates a more substantial, permanent river.
(1 mark)
Question 6 (3 marks)
(a) Answer: Any two from:
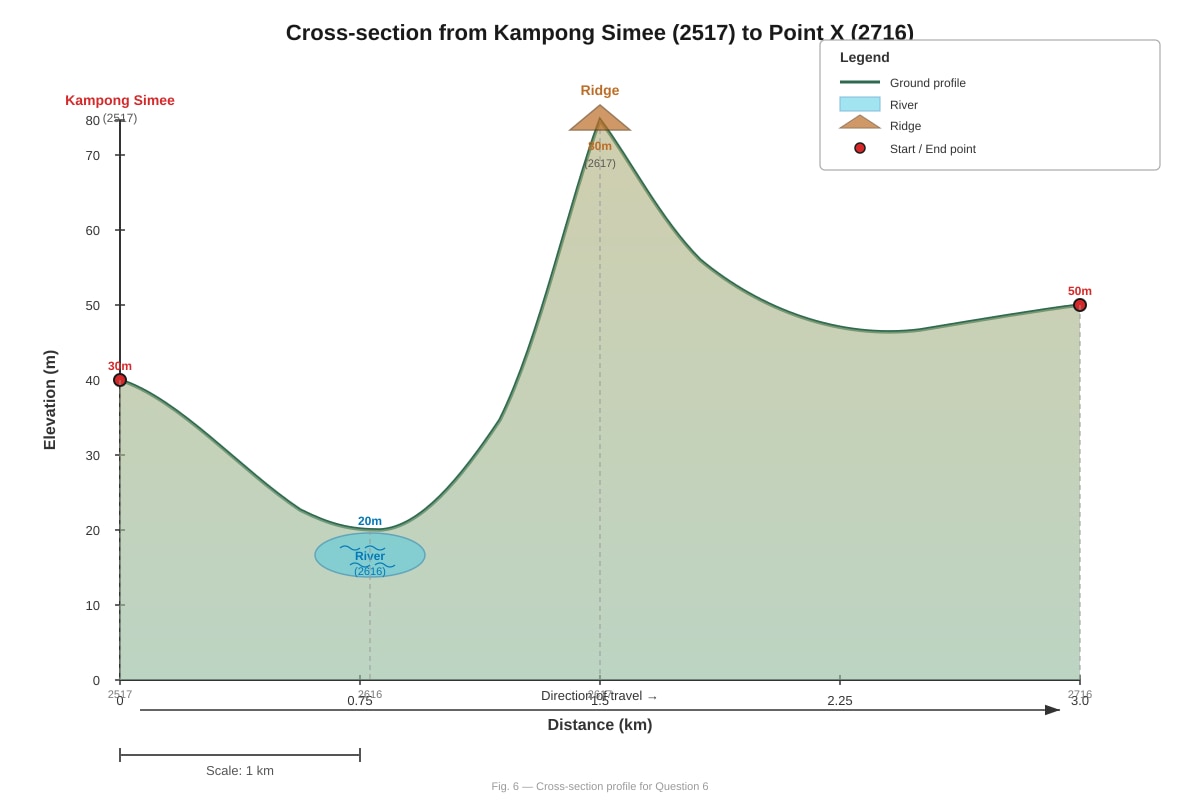
- Drops from ~30m to ~20m when crossing the river at 2616
- Rises significantly to ~80m on the ridge at 2617
- Falls again to ~50m at point X (2716)
- Overall change: net rise of approximately 20m from start to finish
Teaching notes: Read the cross-profile carefully. Going from 2517 to 2716, the route first descends to the river valley, then climbs steeply over a ridge, then descends slightly to point X. Mention specific features and approximate elevations.
(2 marks: 1 mark per valid change, max 2)
(b) Answer: The river at 2616 blocks a straight path; OR the steep ridge at 2617 would require diversion; OR dense vegetation/forest prevents direct walking; OR there are no roads/paths on the straight-line route.
Teaching notes: Straight-line distances ignore terrain obstacles. In reality, you must follow paths around barriers like rivers (need bridge), steep slopes (need gentler route), or vegetation.
(1 mark)
Question 7 (3 marks)
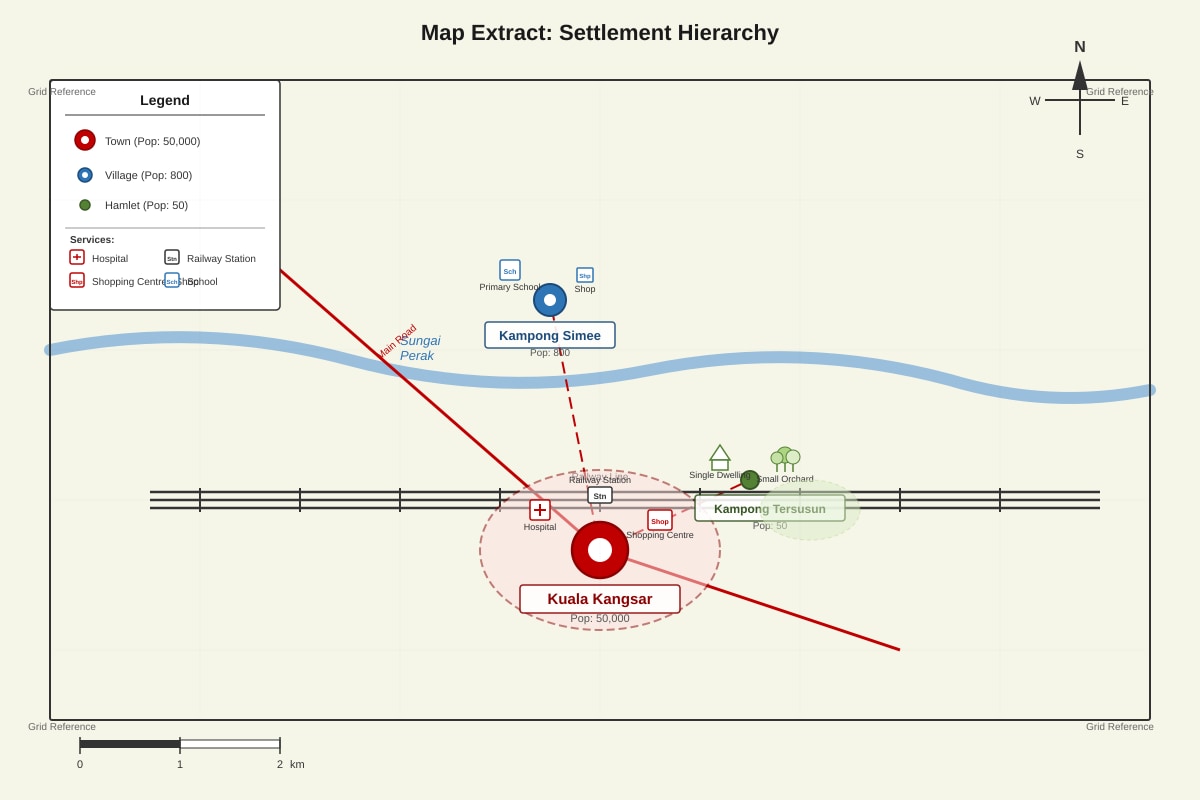
(a) Answer: Kampong Tersusun is the hamlet.
Reason: It has the smallest population (50); OR it has only one dwelling and no services; OR it is the smallest settlement with the lowest order of services (no shop, school, etc.).
Teaching notes: Settlement hierarchy by size:
- Hamlet: smallest, few houses, no services
- Village (Kampong): larger, basic services like shop or primary school
- Town/City: large population, many high-order services
Compare the three settlements: Kampong Tersusun has only 50 people and one dwelling — clearly a hamlet.
(2 marks: 1 mark for correct identification, 1 mark for valid reason)
(b) Answer: Hospital / railway station / shopping centre (any one)
Teaching notes: High-order services are those used infrequently, serving a large population, and found only in larger settlements. A hospital requires a large catchment population to justify its cost; a railway station needs high demand; a shopping centre with department stores needs many customers. These contrast with low-order services like a small shop or clinic found in villages.
(1 mark)
Question 8 (2 marks)
Answer: Grid square 2616 has dense forest/vegetation (shown by green shading/tree symbols); grid square 2517 has mixed land use with agriculture and some built-up areas (less continuous vegetation).
OR: 2616 shows darker/more extensive green colouring indicating forest; 2517 shows patchwork of different colours with less forest cover.
Teaching notes: Vegetation on maps is typically shown by green tones or specific symbols. Compare the two grid squares using map evidence — colour intensity, presence of specific vegetation symbols, or annotations. Be specific about what you see on the map.
Marking descriptors:
- 2 marks: Clear comparison using specific map evidence from both squares
- 1 mark: Partial comparison or one square only described
(2 marks)
SECTION B: Graph and Data Interpretation (22 marks)
Question 9 (3 marks)
(a) Working: 320 + 280 + 295 + 240 + 205 + 145 + 120 + 135 + 180 + 260 + 310 + 345
= 2,830 mm
Teaching notes: Add all monthly values carefully. Check by grouping: (320+280)=600; (295+240)=535; (205+145)=350; (120+135)=255; (180+260)=440; (310+345)=655. Total = 600+535+350+255+440+655 = 2,830 mm.
(2 marks: 1 mark for correct method/addition shown, 1 mark for correct answer with unit)
(b) Answer: July (120 mm)
Teaching notes: Read the values carefully — do not confuse lowest rainfall with highest. July has 120 mm, which is lower than August (135 mm). Check all values to confirm.
(1 mark)
Question 10 (3 marks)
Marking descriptors:
- 3 marks: Both rainfall bars and temperature line accurately plotted; correct use of dual axes; clear legend
- 2 marks: One element significantly inaccurate or missing (e.g. wrong axis used, several points miscalculated)
- 1 mark: Attempt shows understanding but multiple errors; OR only one variable correctly plotted
- 0 marks: Unrecognisable or no attempt
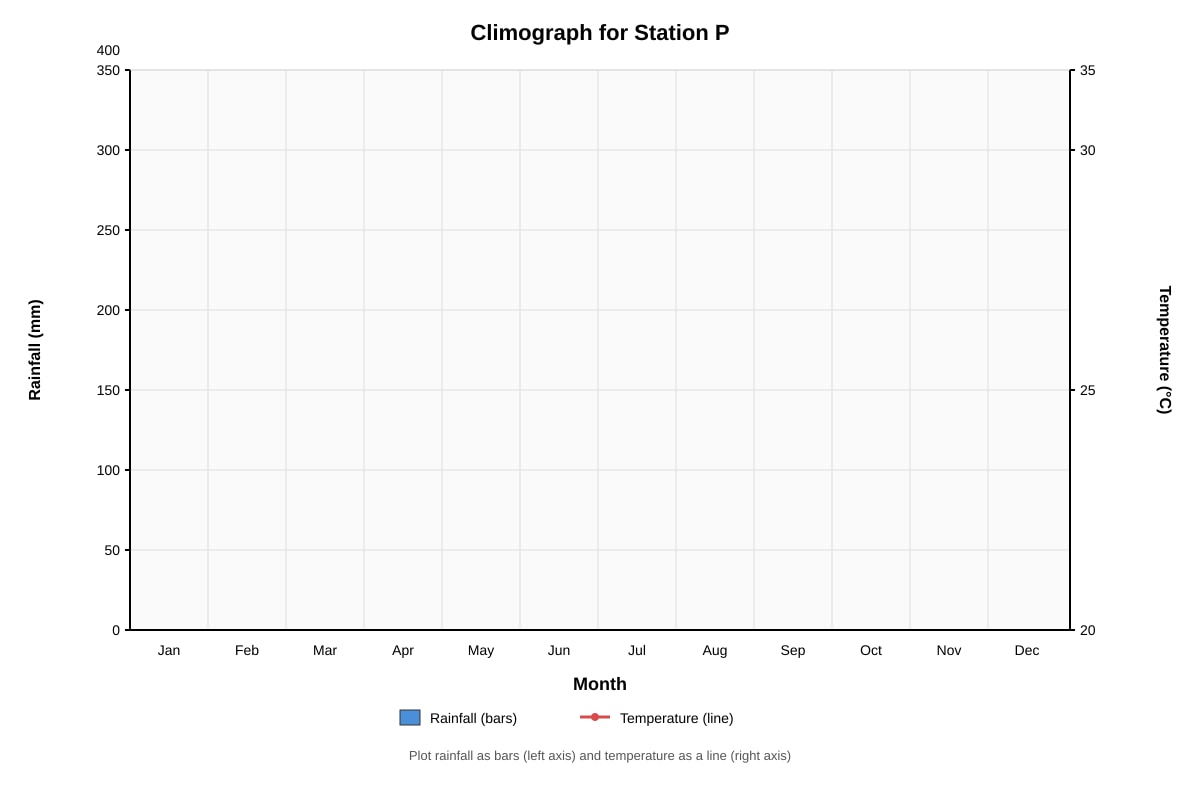
Specific plotting points for verification:
Rainfall bars (left axis, 0-400 mm):
| Month | Height (mm on axis if 1mm=1mm scale, or proportional) |
|---|---|
| Jan | 320 |
| Feb | 280 |
| Mar | 295 |
| Apr | 240 |
| May | 205 |
| Jun | 145 |
| Jul | 120 |
| Aug | 135 |
| Sep | 180 |
| Oct | 260 |
| Nov | 310 |
| Dec | 345 |
Temperature line (right axis, 20-35°C):
| Month | Position on axis |
|---|---|
| Jan | 27 |
| Feb | 27 |
| Mar | 28 |
| Apr | 29 |
| May | 29 |
| Jun | 28 |
| Jul | 27 |
| Aug | 27 |
| Sep | 28 |
| Oct | 28 |
| Nov | 27 |
| Dec | 27 |
Teaching notes: A climograph combines rainfall (usually bars) and temperature (usually line) on one graph with dual y-axes. Always use the correct axis for each variable. Plot points accurately and join temperature points with straight lines. Label or use a key to identify which is which.
(3 marks)
Question 11 (4 marks)
(a) Answer: Temperatures are high throughout the year (between 27°C and 29°C); there is little variation (only 2°C range between highest and lowest); the warmest months are April and May (29°C); the "coolest" months are January, February, July, August, November, December (all 27°C).
Marking descriptors:
- 2 marks: Describes both high overall values AND small seasonal variation
- 1 mark: Describes one aspect only (e.g. just "hot all year" without noting stability)
Teaching notes: Look for both absolute values and variation. Terms like "stable," "consistent," "little seasonal change" are appropriate for tropical climates. Avoid saying "cold" or "cool" for 27°C — this is warm/hot by most standards.
(2 marks)
(b) Answer: Between June and August, Station P experiences the south-west monsoon / dry season; this is when the region is under the influence of drier air masses from the southern hemisphere / Australian winter; the inter-tropical convergence zone (ITCZ) has moved north of the equator, taking the main rain-bearing systems with it; ORographic/rain-shadow effects may reduce rainfall; the area may be dominated by subsiding air (high pressure) which inhibits convection.
Accept simplified version: "The winds blow from the interior/dry land rather than from the sea" or "It is the drier monsoon season when winds come from Australia which is cooler and drier."
Teaching notes: Monsoon climates have distinct wet and dry seasons controlled by seasonal wind shifts. In the northern hemisphere tropics, wet season often coincides with north-east monsoon (winter) and dry with south-west monsoon (summer), though this varies by exact location. The key concept is shifting wind directions bringing different air masses.
Marking descriptors:
- 2 marks: Correct monsoon mechanism explained with geographical terminology
- 1 mark: Vague reference to "dry season" or "less rain" without explanation
(2 marks)
Question 12 (3 marks)
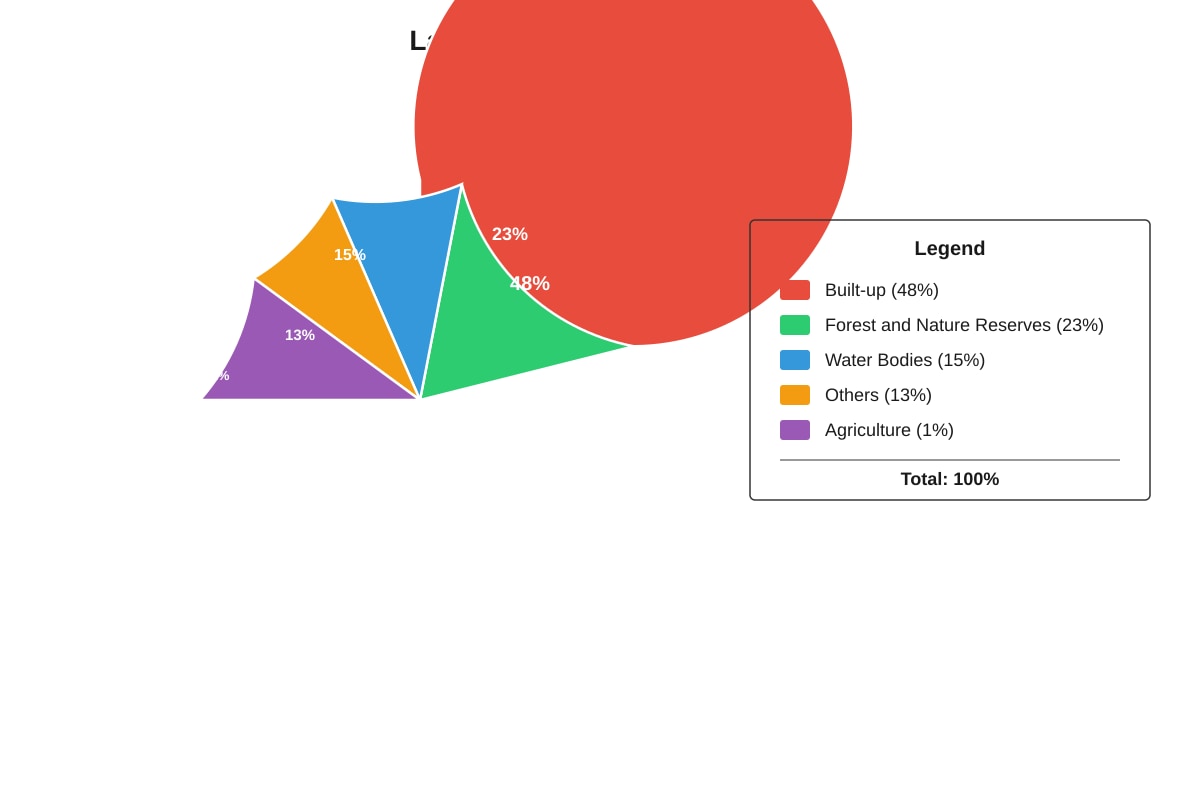
(a) Working: Non-built = Forest + Agriculture + Water + Others = 23% + 1% + 15% + 13% = **52%
OR: 100% − 48% (built-up) = 52%
Teaching notes: "Non-built" simply means not built-up. Either add the remaining categories or subtract built-up from 100%. Both methods are valid; show your working clearly.
(2 marks: 1 mark for correct method, 1 mark for correct answer)
(b) Answer: Singapore is a small city-state with limited land and high land values; agriculture is not economically viable on expensive urban land; Singapore imports most of its food; the government prioritises housing, industry, and commerce over farming; high-rise farming/vertical agriculture is newer and still small-scale.
Teaching notes: 1% for agriculture in a developed, land-scarce city-state is expected. The opportunity cost of farming is very high — the same land could generate far more economic value as commercial or residential property.
(1 mark)
Question 13 (3 marks)
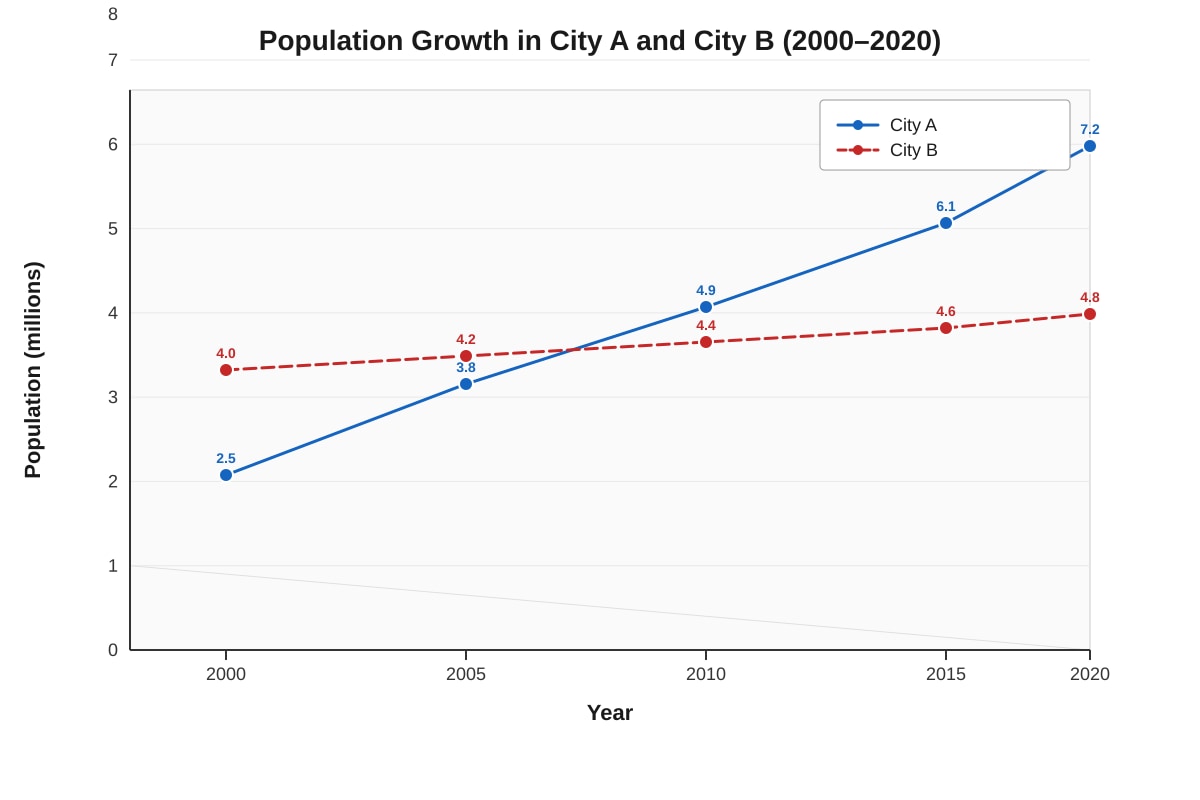
(a) Similarity: Both cities show population growth over the period; both have positive growth rates (no decline); both show gradual rather than sudden changes.
Difference: City A shows rapid/accelerating growth (almost tripled in size); City B shows slow/steady growth (only increased by 20%); City A's growth rate is much faster; by 2015 City A surpasses City B in population despite starting smaller; City A is linear/exponential growth, City B is nearly linear with shallow gradient.
Marking descriptors:
- 2 marks: One clear similarity AND one clear difference stated with data support
- 1 mark: Only similarity OR only difference, OR vague descriptions without data
(2 marks)
(b) Working: Percentage growth = [(Final − Initial) / Initial] × 100 = [(7.2 − 2.5) / 2.5] × 100 = [4.7 / 2.5] × 100 = 1.88 × 100 = 188%
Teaching notes: Percentage growth formula always uses original value as denominator. The increase is 4.7 million on a base of 2.5 million. Do not calculate as [(7.2/2.5)×100] = 288% — this gives the final as percentage of initial, not the growth.
(1 mark: correct working and answer; 0 if formula wrong)
Question 14 (3 marks)
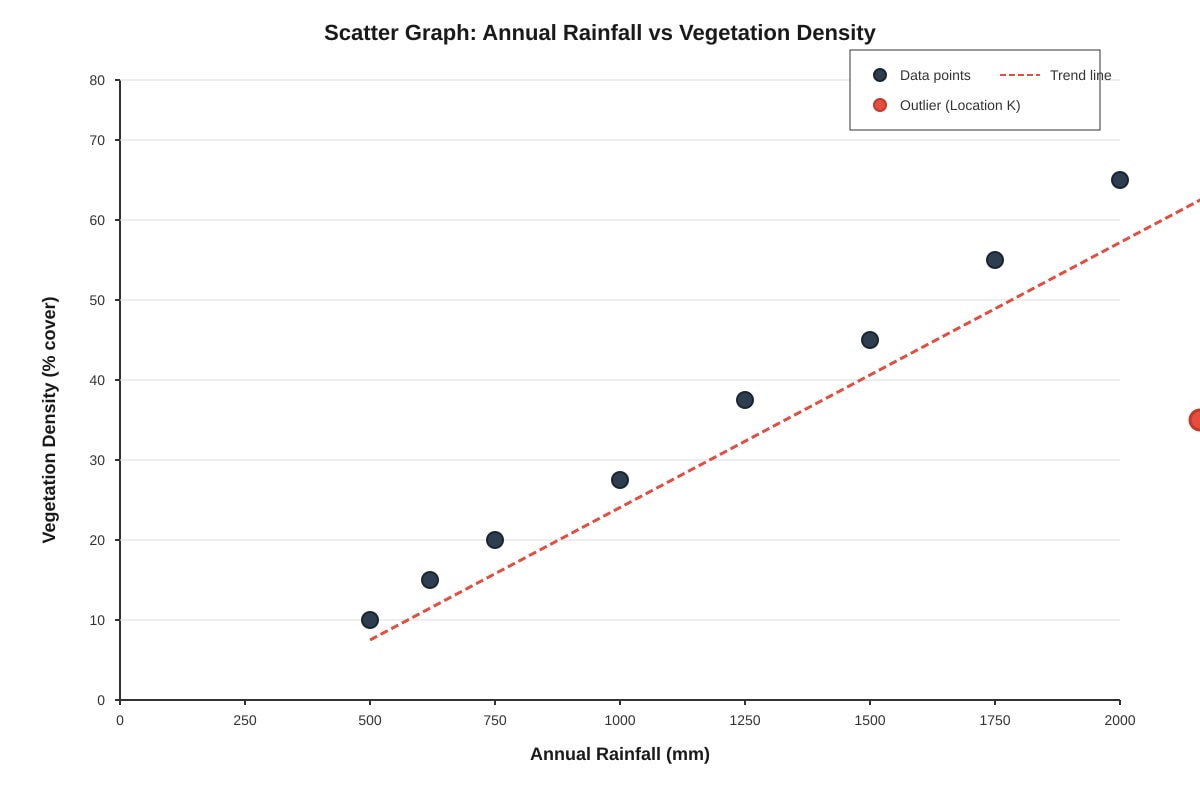
(a) Answer: There is a positive correlation / direct relationship: as annual rainfall increases, vegetation density generally increases; higher rainfall locations tend to have denser vegetation cover.
Teaching notes: "General relationship" — do not say "the more rain, the more vegetation" without qualification. Note it is a correlation, not necessarily causation, and describe the trend direction (positive/negative).
(1 mark)
(b) Answer: Any two from:
- Poor soil quality/nutrients: Despite rain, thin or leached soils (e.g. tropical soils heavily weathered) cannot support dense vegetation
- Human disturbance/deforestation: Location K may have been cleared for logging, agriculture, or settlement
- Poor drainage/waterlogging: Excess rain without good drainage can drown roots and reduce vegetation
- Altitudinal/latitude differences: Cold temperatures at high altitude reduce growth even with rain
- Geological/mineral poverty: Bedrock may lack nutrients needed for plant growth
Teaching notes: An outlier breaks the general pattern — identify specific local factors that could override the rainfall-vegetation relationship. Consider both natural (soil, drainage, temperature) and human (deforestation, land use) factors.
(2 marks: 1 mark per valid, distinct reason)
Question 15 (3 marks)
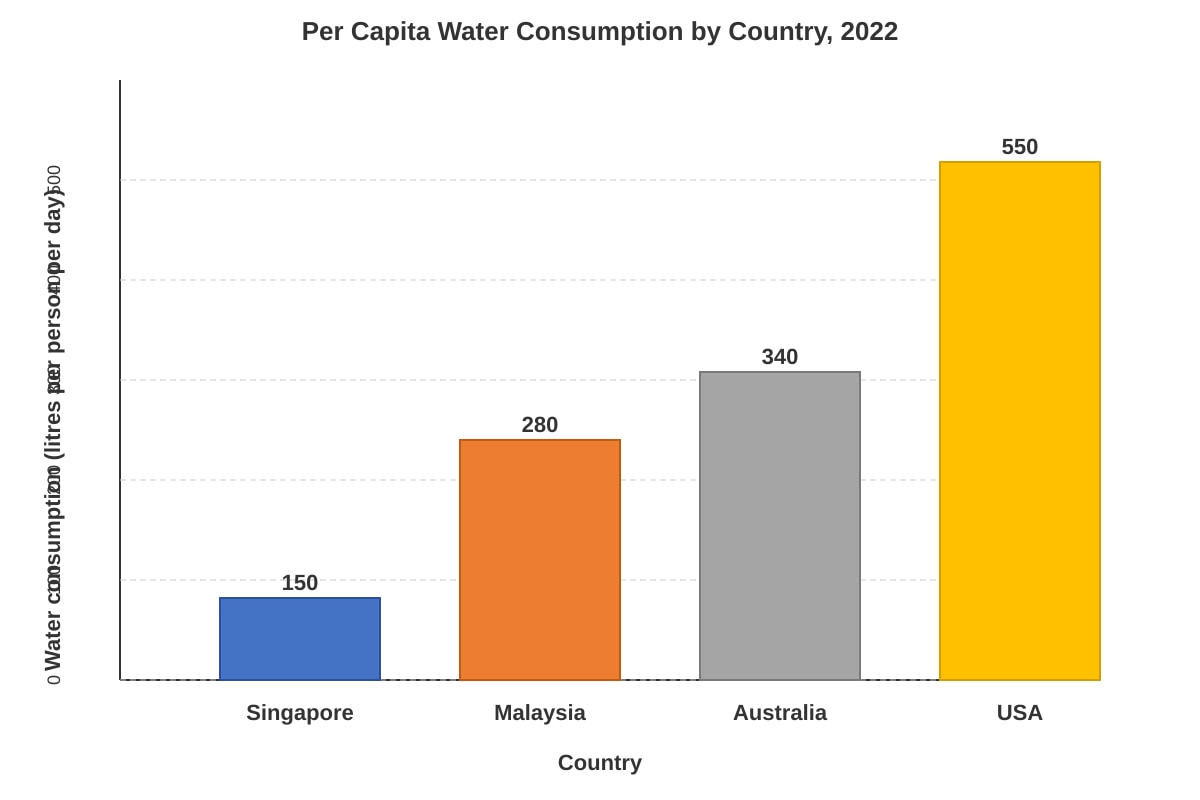
(a) Working: Ratio = USA consumption ÷ Singapore consumption = 550 ÷ 150 = 3.666... = 3.7 (to one decimal place)
Teaching notes: "How many times greater" requires division. Round carefully to one decimal place — 3.666... rounds to 3.7 (not 3.6, since the second decimal is 6 which is ≥5).
(2 marks: 1 mark for correct calculation, 1 mark for correct rounding)
(b) Answer: Singapore has water pricing and conservation measures (ibed system, water efficiency labels); public education campaigns encourage shorter showers, reduced use; limited water supply (no natural lakes, reliance on imports and NEWater) creates incentive to conserve; high population density means shared infrastructure is designed for efficiency; compulsory water-saving fittings in buildings.
Teaching notes: Singapore's water story is nationally significant — understand the "Four National Taps" and why conservation is built into policy and infrastructure. Low consumption reflects policy success, not just climate.
(1 mark)
SECTION C: Data Analysis and Application (18 marks)
Question 16 (4 marks)
(a) Answer: Hottest site: C (Industrial estate, 35.8°C); Most humid site: D (Near reservoir, 82%)
Teaching notes: Read the table carefully — temperature and humidity are separate columns. Site C is clearly hottest (35.8°C vs next highest 34.5°C). Site D is most humid (82% vs next highest 78%).
(1 mark: both correct for 1 mark; 0 if either wrong)
(b) Answer:
- Reason 1: Site B has vegetation/trees which provide shade (reducing solar radiation reaching ground) and release water vapour through transpiration (cooling effect)
- Reason 2: Site B has less concrete/asphalt than Site C; concrete absorbs and re-radiates heat (urban heat island effect), while vegetation has lower albedo cooling through evapotranspiration; OR Site C has industrial activity/machinery generating waste heat
Teaching notes: The urban heat island effect explains microclimate differences. Vegetated areas are cooler and more humid due to: (1) shading intercepting solar radiation, (2) evapotranspiration using energy to convert water to vapour (latent heat), and (3) less heat-absorbing surfaces compared to concrete/asphalt.
Marking descriptors:
- 3 marks: Two distinct reasons explained with clear cause-effect linkage and geographical terminology
- 2 marks: Two reasons given but one under-developed or lacking specificity
- 1 mark: One valid reason only
(3 marks)
Question 17 (3 marks)
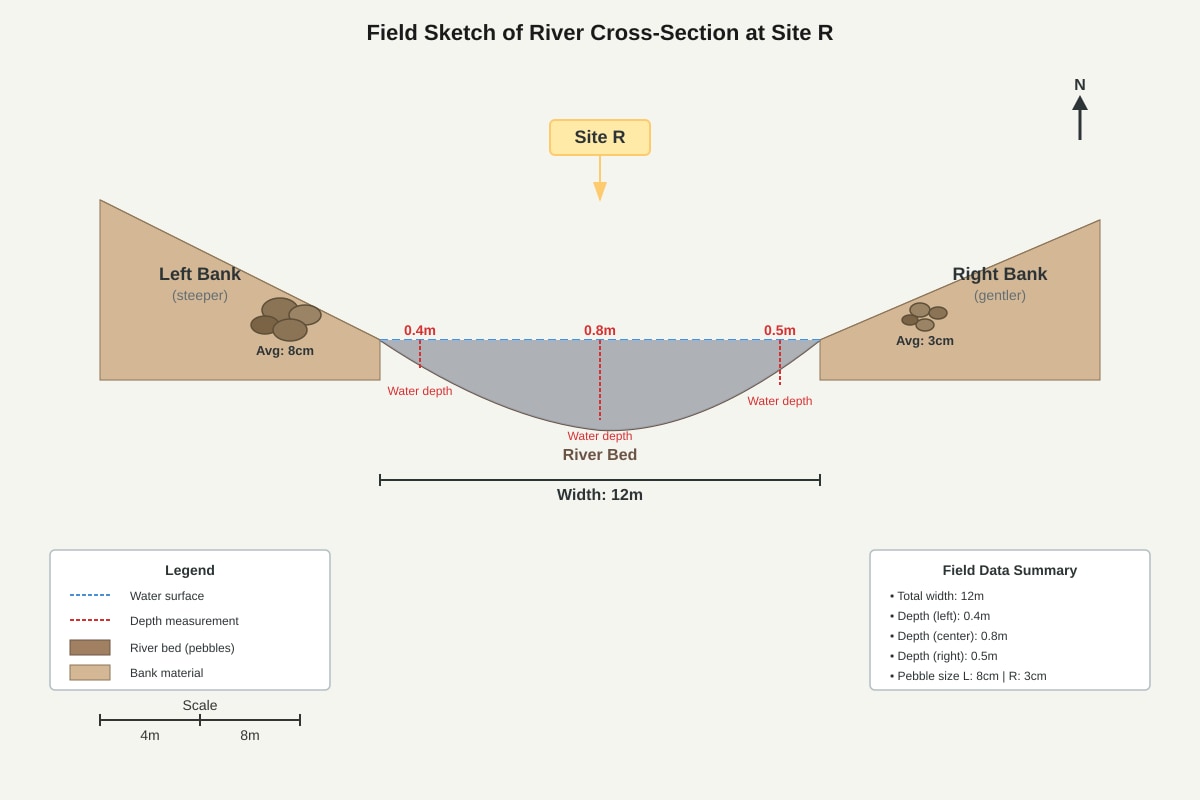
(a) Working: Cross-sectional area of trapezium = ½ × (sum of parallel sides) × perpendicular distance between them
For river cross-section, treat widths and depths:
- Assume the two "parallel sides" are the vertical banks (depth = 0 at both edges, but here we have varying depths)
- More accurately for river trapezium: use average depth × width
Average depth = (0.4 + 0.8 + 0.5) ÷ 3 ... but this is a point sample, not equally spaced.
Better approach using trapezium rule with given points: Width = 12m; depths at left bank (0m from left): 0m (assumed); at 0m: 0.4m? Actually let's interpret:
The cross-section shows depth measurements across: left bank point, center, right bank point. Assuming measurements at positions 0m (left edge), 6m (centre), 12m (right edge):
Area ≈ ½ × [0.4 + 2(0.8) + 0.5]... no, better:
Using trapezoid with two sections:
- Left half (0 to 6m): average depth = (0.4 + 0.8)/2 = 0.6m; area = 6 × 0.6 = 3.6 m²
- Right half (6 to 12m): average depth = (0.8 + 0.5)/2 = 0.65m; area = 6 × 0.65 = 3.9 m²
Total area = 3.6 + 3.9 = 7.5 m²
OR simpler method: Average of three depths = (0.4 + 0.8 + 0.5)/3 = 0.567m; Area = 0.567 × 12 ≈ 6.8 m²
Accept either method if working shown. Given "approximates a trapezium," the two-section method is preferred.
Teaching notes: Cross-sectional area = average depth × width for simple estimates, or trapezium rule for more accuracy. The trapezium area formula from mathematics applies: average of parallel sides × perpendicular distance. In rivers, "parallel sides" are the water surface (width) and the varying depths.
Marking descriptors:
- 2 marks: Correct formula selected, correct substitution, correct answer with unit m²
- 1 mark: Correct formula but arithmetic error, OR correct method without unit
(2 marks)
(b) Answer: The left bank is steeper (or nearer the river's outer bend/undercut bank), causing larger particles to accumulate there; OR the left bank experiences faster flow velocity on the outside of a meander, which can transport and deposit larger material; OR erosion is concentrated on the left bank, exposing larger bedrock fragments.
Alternative: The right bank is the point bar/inner bend where slower flow deposits only smaller particles; the left bank is the erosional side.
Teaching notes: River bank erosion and deposition patterns relate to meander geometry. The outer bend has faster flow, eroding and transporting larger material; the inner bend has slower flow, depositing smaller material. Alternatively, if the river is straight, particle size differences may relate to bank steepness and mass wasting inputs.
(1 mark)
Question 18 (4 marks)
(a) Answer: Dissolved oxygen decreases steadily/downward trend from Point 1 to Point 3: 8.2 → 5.4 → 3.1 mg/L; OR it decreases by more than half (62% decrease) from upstream to downstream.
Teaching notes: Describe trend using data quotes. "Steadily decreases" or "declines progressively" are good geographical terms. Note the magnitude: from healthy (8.2 mg/L supports most aquatic life) to critically low (3.1 mg/L stresses most fish).
(1 mark)
(b) Answer:
Reason 1: Increasing turbidity (5 → 35 → 78 NTU) indicates more suspended particles from soil erosion (farms at Point 2) and urban runoff (Point 3). High turbidity blocks sunlight, reducing photosynthesis by aquatic plants, hence less oxygen production. Also, suspended particles can clog fish gills.
Reason 2: Farm runoff (Point 2) adds nutrients (fertilisers → eutrophication) and organic waste; urban discharge (Point 3) adds sewage and industrial pollutants. Decomposition of organic matter by bacteria consumes oxygen (BOD — biological oxygen demand increases), leaving less dissolved oxygen for aquatic life.
Teaching notes: Water quality indicators interact. Low dissolved oxygen is a symptom, not just a cause. Trace the pollution sources through the catchment: natural/forested (Point 1) → agricultural (Point 2: nutrients, soil) → urban (Point 3: sewage, industrial, more runoff). Eutrophication and BOD are key concepts.
Marking descriptors:
- 3 marks: Two distinct reasons linked to specific data (turbidity rise, pH changes, likely sources) with clear explanation of oxygen depletion mechanism
- 2 marks: Two reasons given but lacking data specificity or full causal chain
- 1 mark: One valid reason only
(3 marks)
Question 19 (4 marks)
(a) Answer: Any two from: Mangrove forest (partially cleared for marina); Coral reef (cruise ship anchorage damages it); Natural coastline (seawall replaces natural shore); Fishing grounds (habitat destruction affects fish breeding)
Teaching notes: Natural features are pre-existing physical/biological elements. The marina replaces mangroves; the seawall armours the coast; anchorage harms coral; the hotel occupies former natural land. "Jetty" is human-made, so not natural.
(2 marks: 1 mark per feature, max 2)
(b) Advantage: The seawall protects the village from coastal erosion/storm surges; creates calmer water for fishing boat mooring; prevents flooding during high tides.
Disadvantage: It disrupts natural sediment movement (longshore drift), possibly causing erosion elsewhere; destroys intertidal habitat used by fish and shellfish; expensive to maintain; may alter wave patterns harming the coral reef; reduces the natural aesthetic affecting eco-tourism potential.
Teaching notes: Hard coastal engineering has trade-offs. Protection vs environmental impact is a classic geography evaluation. The mark split requires one of each — ensure balance in the argument.
(2 marks: 1 mark for valid advantage, 1 mark for valid disadvantage)
Question 20 (7 marks)
Marking descriptors (banded):
Band 3 (5–7 marks): Comprehensive design with all five elements (equipment, method, reliability, presentation, control) clearly addressed. Appropriate geographical equipment named with correct use. Method specifies locations, timing, and variables. Reliability includes repeated measurements, same time of day, same weather conditions. Presentation suggests appropriate graph/table format. Control factor identified with explanation. Uses geographical terminology throughout.
Band 2 (3–4 marks): Partial design with most elements addressed but lacking detail. Equipment list present but use unclear. Method vague on locations or timing. Reliability mentioned but not fully explained. Presentation suggestion basic. Some awareness of fair testing.
Band 1 (1–2 marks): Limited design with significant gaps. Equipment named without explanation. Method unclear. Minimal or no reliability/control measures. Little geographical terminology.
0 marks: No relevant content.
Model answer framework:
Equipment:
- Digital thermometer (measures air temperature in °C) — hold at standard height (1.2m above ground, in shade)
- Hygrometer/sling psychrometer (measures relative humidity) — whirl for 60 seconds, read wet-bulb and dry-bulb temperatures, use tables to calculate RH
- Anemometer (optional: wind speed consistency check)
Method:
- Select paired sites: vegetated area (e.g. park/garden with tree cover >60%) and built-up area (e.g. carpark, concrete playground) within 500m of each other and at similar altitude
- Take measurements at 4 times: 0800, 1200, 1600, 2000 hours to capture diurnal variation
- At each site, take temperature and humidity readings at 3 locations within the area to account for micro-variation (e.g. under tree, at edge of vegetation, in open)
- Record for 5 consecutive days in stable weather (no rain forecast)
Reliability:
- Repeated measurements: 3 readings per site per time, use average
- Same equipment: use same thermometer/hygrometer calibrated before use
- Same person conducting measurements to reduce user error
- Standardised timing: measurements within 10-minute window for paired sites to ensure comparable conditions
- Weather diary: record cloud cover, wind, recent rain to interpret anomalous results
Presentation:
- Table: raw data with columns for Site, Time, Date, Temperature (°C), Humidity (%), Averages
- Graph: dual-axis graph showing temperature and humidity trends over time for both sites
- Calculated values: mean differences, range, standard deviation if appropriate
Control factor:
- Time of measurement: must be simultaneous (or nearly so) for both sites; solar radiation changes rapidly, so 30 minutes difference could invalidate comparison
- Altitude/shelter: sites at same elevation and similar wind exposure
- Cloud cover: only compare data from days with similar sunshine hours (check meteorological records)
Teaching notes: Fieldwork design questions assess understanding of scientific method in geographical context. The hypothesis specifically compares two variables (temperature and humidity) across two environments, so paired sites are essential. Controls are crucial — geography fieldwork often lacks laboratory precision, so explicit attention to controlling variables demonstrates higher-level thinking. The 7-mark question requires detailed, structured response — plan with headings before writing.
(7 marks)
TOTAL MARKS: 60
Mark distribution check:
- Section A (Q1–8): 2+3+2+3+2+3+3+2 = 20 ✓
- Section B (Q9–15): 3+3+4+3+3+3+3 = 22 ✓
- Section C (Q16–20): 4+3+4+4+7 = 22 ✓
- Total: 60 ✓
Expected timing:
- Section A (20 marks): ~20 minutes (map work can be time-consuming)
- Section B (22 marks): ~25 minutes (graphing and calculations)
- Section C (18 marks): ~25 minutes (longer written responses)
- Review buffer: ~5 minutes
- Total: 75 minutes ✓